
The AI Form Builder (WP SmartPay Pro) lets you generate a complete payment form from a plain-English prompt. Instead of dragging and dropping individual blocks, describe what you need and the AI assembles the form structure for you — you then review, adjust, and publish.
Pro feature: The AI Form Builder requires WP SmartPay Pro with an active license and an AI Provider configured under SmartPay → Settings → AI / MCP → AI Provider.
Prerequisites
WP SmartPay Pro installed and licensed
An AI provider API key configured — go to SmartPay → Settings → AI / MCP and open the AI Provider tab. Enter your API key (OpenAI, Anthropic, or compatible) and save.
Opening the AI Form Builder
Go to SmartPay → Forms and open any existing form, or click Add New to start fresh.
In the form editor, look for the Plugins icon in the top-right toolbar area (the puzzle-piece icon, next to Settings).
Click it to open the plugin sidebar, then click AI Form Builder in the panel list.
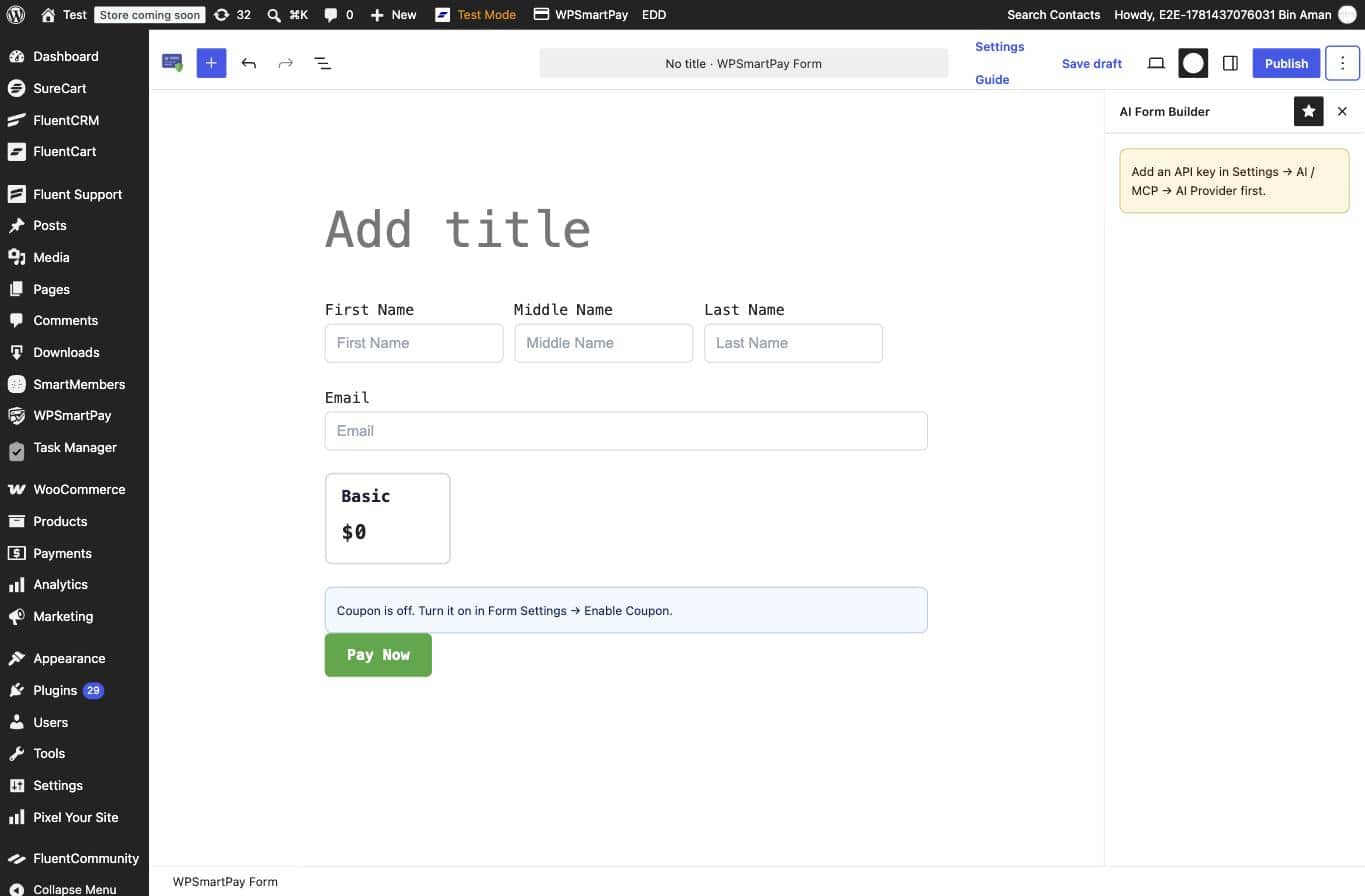
Note: If the API key is not configured, the AI Form Builder panel shows a warning: "Add an API key in Settings → AI / MCP → AI Provider first." Configure the key, then return to the form editor.
Generating a Form
In the AI Form Builder sidebar panel, type a description of the form you want in the Describe your form textarea. Be specific about the fields and purpose.
Click Generate.
The AI calls the REST endpoint and returns a list of block definitions. A preview of the blocks appears in the panel — for example "• name fields, • email, • address, • text input: Company Name".
Review the list. If the structure looks right, click Insert to add the blocks to the form canvas.
If you want to try again, click Clear and enter a revised prompt.
Example Prompts
"A donation form with a custom amount, donor name, and a message field."
"A registration form for an event — collect name, email, company, and dietary requirements."
"A simple payment form with name, email, and an address for shipping."
Reviewing and Editing the Generated Form
After inserting, the blocks appear on the form canvas exactly as you would have placed them manually. You can:
Select any block and adjust its settings in the inspector (e.g., toggle sub-fields on the Name block, choose Layout Columns)
Drag blocks to reorder them
Delete blocks you do not need
Add additional blocks from the block inserter (+) or the Guide
Publishing the Form
Once you are satisfied with the form, click Publish (or Update for an existing form) in the top-right corner. The shortcode appears in the Forms list and can be pasted onto any page or post.
Tips
The AI generates field blocks only — it does not configure pricing or gateway settings. Set those in the WPSmartPay Form sidebar after inserting the blocks.
The more detail you include in your prompt, the better the result. Mention specific fields by name.
If the API call fails, check your API key under Settings → AI / MCP → AI Provider and verify you have not exceeded your monthly call limit.